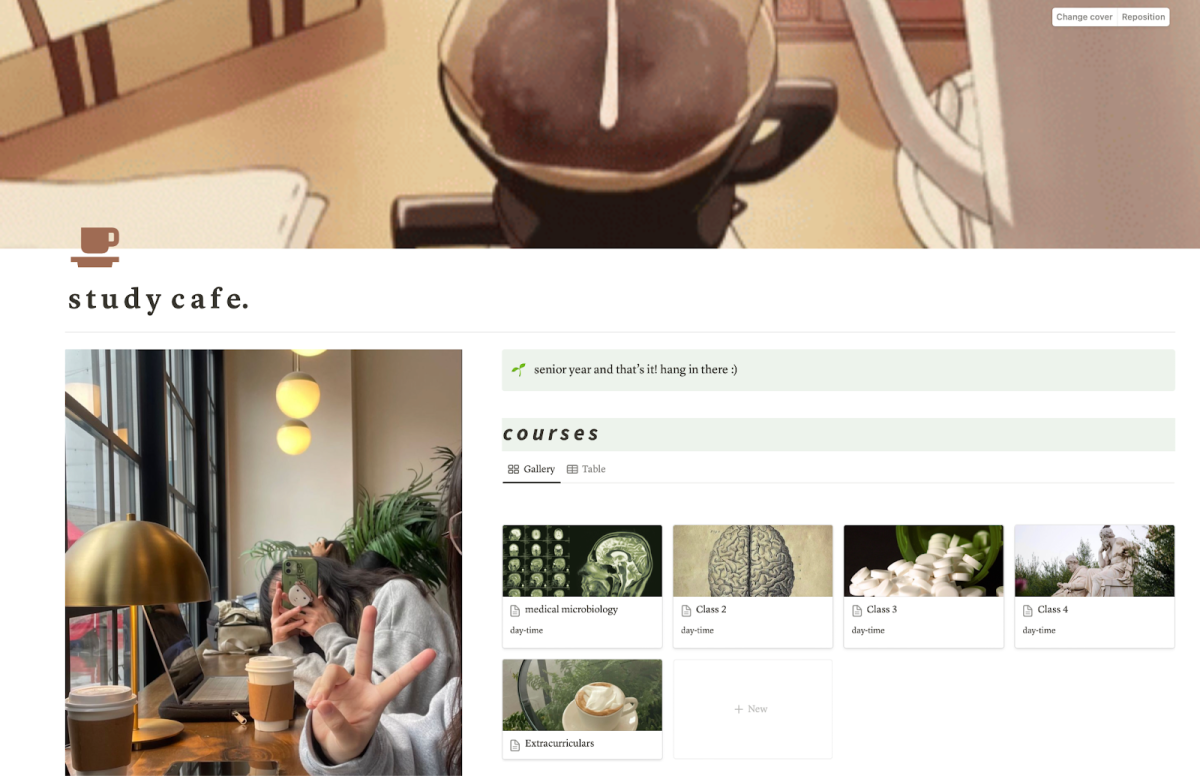
As a busy senior student with a heavy workload and too many class assignments, I simply can not rely on Canvas as a sole platform for organization. I’ve turned to a platform called Notion, a planning software that allows you to schedule tasks and acts as your personal web page you can customize to fit your scheduling and organizational needs. Seeing the results of organization translate into a cohesive color-coordinated dashboard that easily breaks down all my class assignments, extracurricular activities, and scheduled events eases the initial stress that comes from the workload I have to manage. It’s easy to personalize the Notion dashboard through the addition of custom aspects from an embedded Spotify playlist to kanban boards for task organization. Each banner and page of Notion is fully customizable and the UX design of Notion enables users to change various aspects of their page, from the color way and image banner to what types of organizational tools are on individual pages. However, learning to layout and format your Notion page to fit your specific needs requires some guidance and knowledge of how the platform works.
 Set up a Notion Account to create your page.To set up an account on Notion all you need to do is go to the Notion website and sign up with your email address. I recommend using an email address that you will check often in order to make Notion easier to access from your desktop depending on the account that you are signed into on your browser.
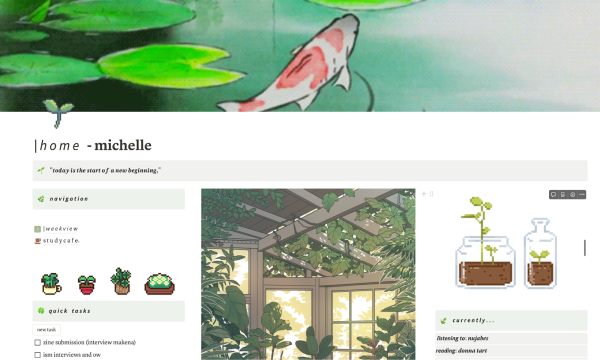
- Create the Notion homepage.After setting up your Notion account, to set up the homepage and change fonts click on the three dot icon in the corner and then you should be able to change the font of the page. Certain fonts convey different visual aesthetics. From a serif font that may be more decorative or stylistic to a Mono or Default font that may convey a minimalistic and simple look to the Notion page. Keep in mind that the Mono or Default font can be easier to read, giving a more professional style to your page.To change the image of the banner, click on the banner at the top of the page and you should be able to upload your desired image to Notion. If you want to upload the GIF, you can paste the gif image link onto Notion and it will show up as the animated GIF on your Notion homepage.

Click on the change cover button once you hover over the banner of the home page.

Upload your desired image link or upload your image (it should be either a JPG or PNG onto the Notion banner.)
To add a personal icon onto the banner, for example I have a plant icon to match my theme, you need to click on the emoji icon that comes with the standard notion page. This should allow you to upload a custom image you want as the icon. The icon can be created by going onto SuperImpose and editing the white background out of the icon. I’ve shown how my icon looks on my Notion page in the image below.

- Create the layout of the Notion page and add organizational elements to the page.
Know what layout page you want on your homepage, whether it’s a timeline view table to keep track of assignment grades, a calendar, or kanban board: each of the elements that comprise an efficient Notion page can be added easily as shown in the steps below. Know that depending on what you want your page to have, certain elements may be more useful than others. For example, if you have a page where you want to organize coursework, you could add a class calendar and a divider titled “notes” where each subpage could contain each lecture’s notes that you take in class. Remember that each page of Notion is completely customizable. Within my Notion homepage I have a sub page titled “week view’ which contains a planner where I organize daily tasks. I’ve shown examples of what the kanban board, calendar, and cell blocks can look like on Notion. I recommend adding a kanban board to a class page or school task page since it might assist you in categorizing on the progress of specific assignments or class projects, keeping you on track. However, a calendar or to-do list might be more useful for small daily reminders or for scheduling future events.
 A kanban board with class assignments displayed above.
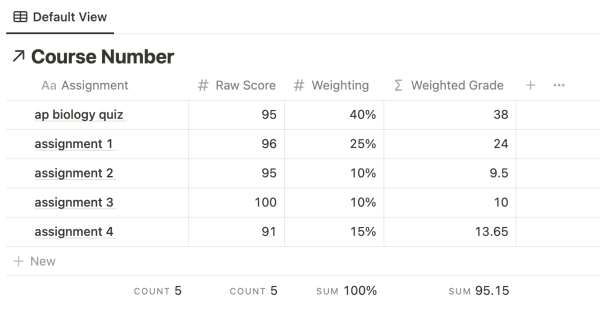 A timeline view table showing the tracking of course grades.
i.) If you want to add heading blocks, choose from the title callout option and you will be able to resize the heading blocks accordingly. The callouts could be titled to whatever you want to be depending on what pages or tasks you’ll have.

ii.) Edit the headings of each section by clicking on the title that is shown on the page and editing it to be personalized. Keep in mind if your goal is organization, make sure the headings are relevant to what you want for your notion page. For example, you could title one divider of your Notion homepage as “school” or “extracurriculars” to organize sections based on what tasks need to be planned.

iii.) Apply separate pages and necessary aspects to your Notion Home page layout. This can be done through adding various organizational tools from to-do lists or sub pages on Notion. The option to add these will all be seen once you click the “add” button and scroll through the navigation in order to find which Notion organizational tools or aspect would be most useful for you to use.
- Embed Spotify onto your Notion page.
Accessing your playlist within your Notion page can make it more complete to your own needs. For me, I liked the addition of my Spotify playlist within my Notion page since it allowed me to not deal with the hassle of opening additional tabs and keep myself on task while completing assignments.i.) To add a Spotify playlist onto Notion, first choose the playlist you want to embed onto Notion and click “share.” This will enable you to share the link to your playlist and make it public.ii.) Then go onto the notion page and click “create embed” on the pop up. This will allow your Spotify playlist to be embedded onto the page and you can play music directly from your Notion saving the hassle of having to open up multiple tabs, etc. It should pop open on the page and show up as part of your complete Notion page. Test to make sure you’re able to access the Spotify playlist and play music directly from your Notion page. - Add elements that bring customization to your Notion Page.
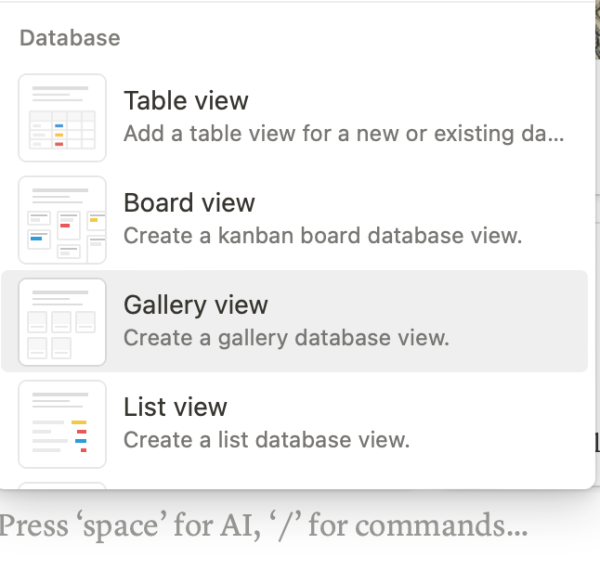
The final step is to complete your Notion page by adding sections that you’ll be able to make use of. Other than just adding embedded Spotify playlists, you can also add sections for a gallery view with various sections for different classes like I have done below. To add a gallery like I have done for the courses I’m taking, all you need to do is click on an empty line and select “gallery view” this will allow you to add different “cards” that can translate into different courses. Each part of the gallery view is a small sub page that contains the information about the course.

Notion is a complex tool for organization, but with some guidance and personalization, it can easily become a tool that you will continue to rely on. Make sure to customize your Notion page to your needs whether it relates to team organization or your personal scheduling for class assignments. After creating your Notion page, test out how it works with your daily life and adjust the elements of your page based on how efficient it is in managing your workload. If your Notion page isn’t working for you, reassess your design and change it to meet your needs.


