
Using a well-fitted shirt, some paper, and a marker, you can create a simple base pattern for future sewing projects without needing expensive tools or experience. This guide shows you how to create both the body-pattern and sleeves pattern of a shirt as well as explaining important details like seam placement, fabric choice, and how to make clean adjustments for fit and style.
Key materials:
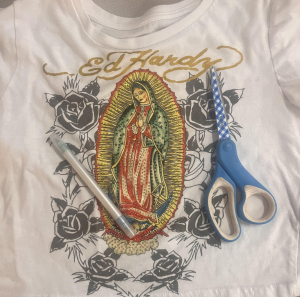
- A well-fitted top
- A marker or sharpie that shows well on paper
- A large sheet of paper
- A pair of scissors or a box cutter
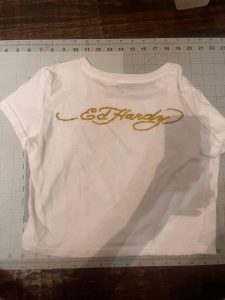
When finding a top to use, ensure that you choose a top that fits you well. There are a few key tips to take note of before beginning your pattern making project. The first tip is to ensure that the shirt’s shoulder’s line with your own at a clear, direct point so that you can use it as a guideline for where your shoulders should be. It’s also important to make sure not to use a shirt with stretchy fabric, as stretchy fabric is made to conform to your body’s shape rather than being a true fit, so using it as a pattern base isn’t recommended.
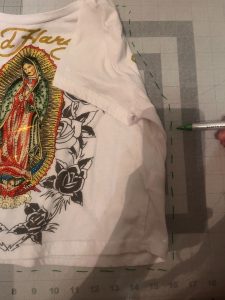
If you have chosen your well-fitted shirt, you’re ready to move on to the next step: tracing the front. You’re going to need to take out a large sheet of paper and a marker. Any type of paper will do as long as it’s large enough to comfortably leave a generous amount of room around your chosen shirt, however transfer paper is especially recommended as its sheerness will make it easier to use as a reference for future projects.
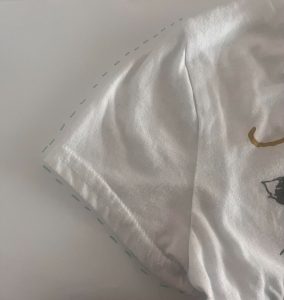
First, fold your paper in half and place your shirt flat on the center. Sleeves are a separate part of the pattern making process, so ensure that before tracing, fold your sleeve inwards to the shirt to avoid outlining its shape.
A helpful trick to use when folding in your shirt’s sleeve is to place your thumb on the seam-line and then fold in the sleeve over your thumb. Using the placement of your thumb as a pin-point, use your marker to mark where the sleeve folds in from the seam line. This way, you can trace your shirt while keeping an accurate measure of where you will need to attach your sleeve in the following steps.
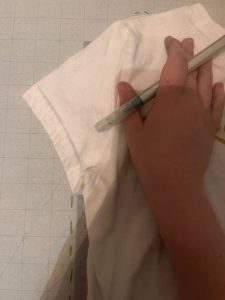
When outlining the shirt, use your marker to create a sequence of dotted lines about a half inch away from the fabric. Once you’re finished outlining the front, remove your shirt and flip over your folded paper. Add a small mark for where the bottom and top of the front of your shirt ends, ensuring that the size of the back is kept accurate to the size of the front. Now using the backside of your shirt, repeat the process of outlining.
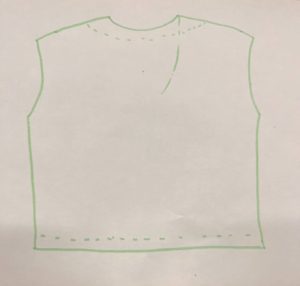
If you want to lower the front of your neckline, use your marker to add scoops around the collar based on the amount of length you want to remove. To widen the outline, use your marker to trace outwards from the center of the collar. At the bottom of the pattern, to either elongate or crop your shirt, you can adjust the fabric based on where you mark the shape of your cut. Once the front and back of your body-patterns are traced and modified, you can cut them out.
A key point to note about body-patterns is that the back of your shirt collar will usually be higher than the front and that the arm-hole on the front will typically be steeper than the arm-hole on the back. This is due to the front of the shirt having to accommodate for much more arm-motion than the back as well as having to support the shape of your chest.
Now that the body patterns are finished, you can move on to creating the pattern for the sleeves. Lay out the front of your shirt’s sleeve on the folded paper and begin tracing just as you did with the body of the shirt. The only difference between tracing the sleeve and tracing the shirt’s body is that you must peel back the fabric of the sleeve to trace where the seam-line is.
For the backside of the sleeve, flip your paper over, mark where the top and bottom of the sleeve cut off, flip your shirt over and line the sleeve up to the paper according to where the marked lines are and then begin tracing.
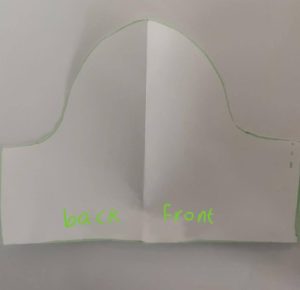
When you unfold the paper you’ll notice how the front-side of the sleeve has a much steeper curve than the back-side, which will appear more straight. Just like the body-patterns, this is because more fabric is required to support the arm movement from the back of the shoulder.
To create longer sleeves, the cut-out pattern-base can be extended with fabric.
Pattern-making is an important part of understanding the process of how shape and structure are created to fit certain articles of clothing. With these patterns, you have unlocked a reusable foundation for a variety of future sewing projects as well as a way to easily replicate your favorite shirts and experiment with different designs and styles.